Skip to content
v2.26.0
Muscle-building advice

How to Squat with Proper Form: A Science-Based Technique Guide

Learn how to squat with proper form using biomechanics research. Covers depth, stance, knee tracking, bracing, common mistakes, and a science-based squat checklist.

Jeremy Tellier Updated
  • squat form
  • squat technique
  • biomechanics
  • exercise technique
  • strength training
  • squat depth
  • workout tips
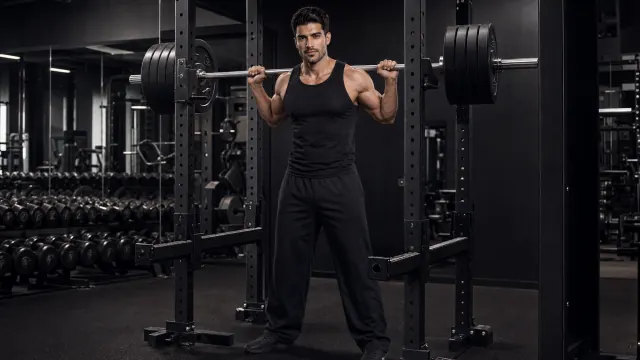
Athlete performing a barbell back squat with correct technique in a gym

The Short Answer

Proper squat form comes down to five checkpoints: feet shoulder-width with toes slightly out, knees tracking over your toes, a neutral spine with a braced core, depth reaching at least parallel (hip crease below knee), and the bar traveling in a straight line over the middle of your foot. Get these right and the squat becomes one of the most effective exercises for building lower-body muscle and strength.

The squat is a compound movement that engages the quadriceps, glutes, hamstrings, adductors, and core simultaneously. No other single exercise matches its combination of muscle activation, hormonal response, and functional carryover. But poor squat form wastes that potential and risks your knees and lower back. This guide breaks down the biomechanics research so you can squat with confidence.

Why Squat Depth Matters More Than You Think

Squat depth is the single most debated form variable, and the science is clear: deeper is generally better for muscle growth.

A landmark EMG study by Caterisano et al. (2002) measured muscle activation at three depths: partial squat, quarter squat, and parallel squat. The results showed that gluteus maximus activation increased significantly with depth. Partial squats produced roughly 50% less glute activation than parallel squats [1].

Bryanton et al. (2012) extended this finding by analyzing relative muscular effort across different depths and loads. They found that deeper squats required greater contribution from the glutes and hamstrings, while partial squats disproportionately loaded the quadriceps without engaging the full posterior chain [2].

The long-muscle-length advantage

More recent research has revealed why depth matters at the tissue level. A 2023 narrative review by Warneke et al. in Sports Medicine explained that muscles trained at long lengths (stretched positions) experience greater hypertrophy than muscles trained at short lengths. This is called stretch-mediated hypertrophy. When you squat deep, your quadriceps, glutes, and adductors reach longer muscle lengths than during partial squats, which may trigger more muscle growth through mechanical tension and metabolic stress [3].

The depth study that settled it

Kubo et al. (2019) ran a 10-week training study where participants squatted at three different depths. Using MRI to measure muscle volume changes, they found that deeper squat training produced greater hypertrophy in the gluteus maximus and adductor longus compared to partial squat training. The quadriceps grew similarly across all depths, but the posterior chain benefited significantly from full range of motion [4].

Practical takeaway: Squat to at least parallel (where your hip crease drops below the top of your knee). If your mobility allows, going slightly below parallel (ATG, or "ass to grass") maximizes glute and adductor development. But never sacrifice form for depth. If your lower back rounds at the bottom, you have gone too deep for your current mobility.

Squat Stance: Finding Your Natural Foot Position

Stance width

A review by Clark et al. (2012) in the Journal of Strength and Conditioning Research analyzed muscle activation across different squat stances. The finding: stance width does not dramatically change overall quadriceps activation. Narrow, shoulder-width, and wide stances all produce similar quad recruitment [5].

However, wider stances increase glute and adductor activation, while narrower stances may feel more natural for lifters with narrow hips. The practical conclusion: pick the stance that feels most stable and allows you to reach depth without your knees collapsing inward.

Foot angle

A 2022 study published in The Journal of Sports Medicine and Physical Fitness examined how foot angle affects lower-limb muscle activity during the back squat. They found that a moderate toe-out angle (15 to 30 degrees) allowed better knee tracking and depth compared to a forward-facing foot position [6].

Practical takeaway: Start with feet shoulder-width apart, toes pointed 15 to 30 degrees outward. Adjust wider or narrower based on comfort. Your hips dictate your optimal stance, not a textbook. If you feel pinching at the front of your hip, try widening your stance or increasing toe-out.

High-bar vs low-bar

The bar position changes which muscles bear the most load:

Bar position Bar placement Torso angle Primary emphasis
High-bar Upper traps More upright Quadriceps
Low-bar Rear deltoids More forward Glutes, hamstrings

High-bar squatting is the default for most gym-goers and bodybuilders because it targets the quads effectively. Low-bar squatting is favored by powerlifters because it allows heavier loads by recruiting more posterior chain. Neither is wrong. Pick based on your goal: muscle growth favors high-bar, maximal strength favors low-bar.

The Descent: Bracing and Knee Tracking

Bracing your core

Before you descend, take a deep breath into your belly (not your chest) and brace your abdominals as if someone is about to punch your stomach. This creates intra-abdominal pressure, which stabilizes your spine and protects your lower back.

Hold this brace throughout the descent and the bottom of the squat. Exhale on the way up, or hold the brace until you pass the sticking point (the hardest part of the lift, usually about one-third of the way up).

Knee tracking

Your knees should travel in the same direction as your toes. If your toes point out 20 degrees, your knees should also track outward at 20 degrees. The most common squat error is knee valgus, where the knees collapse inward. This places dangerous shear forces on the knee ligaments and reduces glute activation.

A study on squat kinematics and sex differences (2023) found that knee valgus during squatting is more common in individuals with weak hip abductors. Strengthening your gluteus medius with side-lying clams, banded walks, and single-leg squats helps correct this pattern [7].

The descent tempo

Lower the bar under control. A 2 to 3 second descent is ideal for most lifters. Fast descents use momentum rather than muscle, and they make it harder to maintain position at the bottom. Pause briefly at the bottom (0.5 to 1 second) to eliminate the stretch reflex if you want to increase time under tension, or use a natural rebound if your goal is lifting heavier loads.

Common Squat Mistakes and How to Fix Them

1. Half-squats (not reaching depth)

The problem: Stopping above parallel limits glute and hamstring activation and can actually place more stress on the knee joint than full squats, because the load is concentrated on the quadriceps tendon without posterior chain support.

The fix: Reduce the weight until you can reach parallel depth consistently. Film yourself from the side to check your hip crease relative to your knee.

2. Knee valgus (knees caving inward)

The problem: The knees collapse inward during the ascent, indicating weak hip abductors and poor motor control. This is a primary cause of knee pain during squatting.

The fix: Actively push your knees outward, as if spreading the floor apart. Add banded squats (resistance band around your knees) to train your gluteus medius. If the problem persists, temporarily reduce your load.

3. Excessive forward lean

The problem: Your chest drops toward the floor, shifting the load to your lower back and reducing quadriceps activation. This is common with ankle mobility limitations or weak quads.

The fix: Improve ankle dorsiflexion with calf stretches and wall ankle mobilizations. Elevate your heels slightly (weightlifting shoes or small plates) if mobility is the bottleneck. Strengthen your quadriceps with leg press and split squats.

4. Heel lift

The problem: Your heels rise off the floor during the descent, indicating limited ankle dorsiflexion. This shifts your center of gravity forward and reduces stability.

The fix: Same ankle mobility work. In the short term, squat with heels elevated. Long term, address the mobility restriction so you can squat flat-footed.

5. Buttocks wink (posterior pelvic tilt at depth)

The problem: At the bottom of the squat, your lower back rounds under, creating a "butt wink." Mild rounding is normal, but excessive posterior pelvic tilt under load places shear stress on lumbar discs.

The fix: Reduce your depth slightly. Not everyone has the hip anatomy to squat ATG without lumbar rounding. A study on lumbar curvature during restricted and unrestricted squats (2016) confirmed that ankle dorsiflexion and hip joint structure both limit how deep you can squat before your pelvis tucks [8]. Work within your anatomy, not against it.

Squat Depth and Knee Health: Debunking the Myth

The belief that deep squats damage your knees is one of the most persistent fitness myths. It originated in the 1960s when a study suggested that deep squats stretched the knee ligaments. That study was later discredited, and decades of subsequent research have shown the opposite.

Escamilla et al. (2001) published a comprehensive biomechanical analysis in Medicine and Science in Sports and Exercise examining knee forces during the dynamic squat. They found that peak tibiofemoral compressive forces increase with depth but remain within safe ranges for healthy knees. The posterior cruciate ligament (PCL) experiences increased force during deep squats, but these forces are well below the threshold for tissue damage in healthy individuals [9].

The researchers concluded that squats are safe for the knees when performed with proper technique and appropriate load. The caveat: individuals with existing knee pathology (patellofemoral pain syndrome, meniscus tears, osteoarthritis) should consult a physical therapist before squatting to depth.

Bottom line: Deep squats do not cause knee damage in healthy individuals. The forces on the knee joint are moderate and within the range that the joint is designed to handle. What does cause knee damage is poor form: knee valgus, excessive load without proper progression, and squatting through pain.

How to Program Squats for Muscle Growth

The squat is a foundational exercise, but it needs proper programming to deliver results. Here is what the research supports:

Volume

The current evidence suggests 10 to 20 working sets per muscle group per week for hypertrophy. Since the squat trains multiple muscle groups simultaneously, 3 to 5 sets of squats per session, performed 2 times per week, covers a significant portion of your lower-body volume.

Rep range

A meta-analysis by Schoenfeld and colleagues found that hypertrophy occurs across a wide range of rep ranges (from 5 to 30+ reps), as long as sets are taken close to failure. For practical purposes, 6 to 12 reps per set is the sweet spot for the squat: heavy enough to build strength, light enough to maintain form across multiple sets.

Progressive overload

Progressive overload, the gradual increase of training stimulus over time, is the primary driver of muscle growth. This means adding weight, reps, or sets over weeks and months. The squat responds well to linear progression for beginners (add 2.5 kg per week) and to periodized progression for intermediates.

Sample squat-focused leg day

Exercise Sets Reps Rest
Barbell back squat 4 6 to 8 3 min
Romanian deadlift 3 8 to 10 2 min
Bulgarian split squat 3 10 to 12 per leg 90 sec
Leg curl 3 12 to 15 60 sec
Calf raise 4 15 to 20 60 sec

This session provides approximately 15 working sets for the lower body, which fits within the 10 to 20 sets per muscle group per week guideline when performed twice weekly.

Start a real strength program for free

Generate a progressive plan with videos and tracking. Free app. WorkoutGen Max adds AI load suggestions, full customization and advanced analytics.

Generate my free program →

Coach's Tips: Squatting Smarter with WorkoutGen

Understanding squat biomechanics is one thing. Applying it consistently across months of training is another. Here is how WorkoutGen bridges the gap between science and your actual workouts.

1. Let the AI handle your volume distribution

The research says 10 to 20 sets per muscle group per week. But how you split that across 3, 4, or 5 training days matters. WorkoutGen takes your level, goal, and available days, then distributes squat volume across your training week automatically. If you train 4 days per week, the AI might program squats twice: once heavy (strength focus) and once moderate (hypertrophy focus). You do not need to calculate sets, reps, or percentages yourself.

2. Progressive overload is built into every session

Every WorkoutGen program includes automatic progressive overload. When you log your squat weights and reps in the built-in workout tracker, the AI uses your recent performance to suggest the next load. This is not a guess. It is a calculated progression based on your strength profile, ensuring you add stimulus without adding it so fast that your form breaks down.

3. Use the exercise video library for form cues

WorkoutGen includes 350+ HD coaching videos filmed by Jeremy Tellier (BPJEPS certified coach). Before each squat session, watch the squat tutorial to refresh your setup cues: bar placement, foot position, bracing sequence. These videos show the exact technique from multiple angles, which is more useful than reading about form.

4. Match your squat variation to your goal

WorkoutGen does not force one squat style on everyone. If your goal is muscle gain, the AI programs high-bar squats for quad emphasis. If your goal is strength, it may cycle in front squats and pause squats to build specific weaknesses. You can also customize your exercises in Settings if you need to swap movements due to equipment or injury.

5. Track depth and form through session feedback

After each squat session, WorkoutGen asks you to rate the difficulty (RPE). If you rate a squat session as unexpectedly hard, the AI may reduce volume next session to prevent form breakdown. This feedback loop is how adaptive programming prevents the overreaching that leads to sloppy reps and injury. Use it honestly.

6. If you are a beginner, start with the free program

WorkoutGen Free generates a full personalized program with progressive overload, exercise videos, and a workout tracker. You do not need to pay to squat correctly. Once you want AI load suggestions, advanced progress dashboards, and full program customization, WorkoutGen Max unlocks those features.

Start training smarter

Get your personalized squat program

Answer a 60-second questionnaire and WorkoutGen builds a science-based program with proper squat volume, progressive overload, and coaching videos.

Generate my free program

The Bottom Line

Proper squat form is not about matching a single ideal. It is about finding the stance, depth, and technique that work for your anatomy while respecting biomechanical principles. Here is your squat checklist:

  1. Feet: Shoulder-width, toes out 15 to 30 degrees
  2. Knees: Track over your toes, never collapse inward
  3. Spine: Neutral, braced, natural arch maintained throughout
  4. Depth: At least parallel (hip crease below knee)
  5. Bar path: Vertical line over the middle of your foot
  6. Tempo: Controlled 2 to 3 second descent, explosive but controlled ascent
  7. Breathing: Brace before descent, hold through the bottom, exhale past the sticking point

The squat is a skill. Treat it like one. Practice your setup, film your sets, and progress your load gradually. The science is clear: full-range squats with progressive overload build more muscle, strengthen your joints, and carry over to every other lower-body exercise.

If you want a program that handles the volume, progression, and exercise selection for you, generate a free personalized plan with WorkoutGen. The AI applies the same research-backed principles covered in this guide, automatically.

Related Reading

References

[1] Caterisano A, Moss RF, Pellinger TN, et al. The effect of back squat depth on the EMG activity of 4 superficial hip and thigh muscles. Journal of Strength and Conditioning Research. 2002;16(4):628-632. PMID: 12423181

[2] Bryanton MA, Kennedy MD, Carey JP, Chiu LZ. Effect of squat depth and barbell load on relative muscular effort in squatting. Journal of Strength and Conditioning Research. 2012;26(10):2820-2828. PMID: 22797000

[3] Warneke K, Hillebrecht M, Wirth K, et al. Physiology of stretch-mediated hypertrophy and strength increases: a narrative review. Sports Medicine. 2023;53(11):2065-2089. PMID: 37556026

[4] Kubo K, Ikebukuro T, Yata H. Effects of squat training with different depths on lower limb muscle volumes. European Journal of Applied Physiology. 2019;119(9):2113-2122. PMID: 31230110

[5] Clark DR, Lambert MI, Hunter AM. Muscle activation in the loaded free barbell squat: a brief review. Journal of Strength and Conditioning Research. 2012;26(4):1169-1178. PMID: 22373894

[6] Maulit MR, Archer DC, Leyva WD, et al. The impact of foot angle on lower limb muscles activity during the back squat and counter movement jump. The Journal of Sports Medicine and Physical Fitness. 2022;62(7):955-963. PMID: 34498821

[7] A Comparison of Squat Depth and Sex on Knee Kinematics and Muscle Activation. Journal of Biomechanical Engineering. 2023;145(7). PMID: 37066975

[8] The geometric curvature of the lumbar spine during restricted and unrestricted squats. The Journal of Sports Medicine and Physical Fitness. 2017;57(6):747-752. PMID: 27015103

[9] Escamilla RF. Knee biomechanics of the dynamic squat exercise. Medicine and Science in Sports and Exercise. 2001;33(1):127-141. PMID: 11194098

Frequently Asked Questions

How deep should I squat?

For maximum muscle growth, squat to at least parallel (where your hip crease drops below your knee). Research shows deeper squats produce greater glute and hamstring activation, and training at long muscle lengths drives more hypertrophy than partial ranges.

Is squatting bad for my knees?

No. A biomechanical review by Escamilla et al. (2001) found that the squat places moderate, safe forces on the knee joint when performed with proper form. Deep squats do not increase knee injury risk in healthy individuals. The key is controlling your descent and avoiding knee collapse.

What is the best squat stance width?

Your stance should match your hip anatomy. A shoulder-width stance with toes pointed slightly outward (15 to 30 degrees) works for most people. Research shows that stance width does not dramatically change overall muscle activation, so pick the position that feels most natural and stable.

Should my knees go past my toes when squatting?

Yes, some forward knee travel is normal and necessary. Restricting knee travel shifts the load to your hips and lower back, which can increase lumbar stress. Let your knees track naturally over your toes as long as they stay aligned with your foot direction.

How many sets and reps should I do for squats?

For hypertrophy, 3 to 5 working sets of 6 to 12 reps per session is effective. Research suggests 10 to 20 sets per muscle group per week optimizes muscle growth. WorkoutGen distributes this volume automatically across your training days based on your level and goal.

What is the difference between high-bar and low-bar squat?

In a high-bar squat, the bar rests on your upper traps, which keeps your torso more upright and emphasizes the quadriceps. In a low-bar squat, the bar sits on your rear deltoids, which leans your torso forward and shifts more load to your posterior chain (glutes and hamstrings).

How do I know if my squat form is correct?

Correct squat form means: feet flat on the floor, knees tracking over your toes, neutral spine with a natural arch, depth reaching at least parallel, and the bar path staying over the middle of your foot. If you feel pain in your knees or lower back, stop and reassess your technique.

Can I build muscle with bodyweight squats alone?

Bodyweight squats build initial strength for beginners, but progressive overload requires adding resistance over time. Once you can do 20+ bodyweight reps, you need external load (barbell, dumbbells, or resistance bands) to continue building muscle. WorkoutGen programs progress your squat load automatically.